
ComplyAdvantage
ComplyAdvantage is one of the leading screening providers, used to check entities against global sanctions lists, PEP registers, and adverse media. Connecting it to Proofdesk means you can screen entities for sanctions, PEP, and adverse media and pull the results straight into Proofdesk, so everything sits alongside the rest of your due diligence rather than in a separate tool.
If your firm isn't set up with ComplyAdvantage yet, no problem - you can request a demo directly from them on their website https://complyadvantage.com/ and their team will get you started. Once you have a ComplyAdvantage account of your own, just drop us a line at team@proofdesk.com and we'll switch the integration on for your Proofdesk organisation.
Configuring ComplyAdvantage
Once that's done, here's how to connect the two. You'll use your normal ComplyAdvantage login details to make the connection - there's no need to generate any separate API credentials. That said, quite a few firms prefer to set up a dedicated ComplyAdvantage user just for this connection, so it isn't tied to one person's individual login.
[SCREENSHOT: ComplyAdvantage configuration screen in Proofdesk]
Once we've enabled the integration for your organisation, in Proofdesk navigate to Organisation Settings (Gear icon on the top navigation bar) -> Integrations and click the Configure button under ComplyAdvantage.
Enter your API Username (your ComplyAdvantage email address) and API Password (your ComplyAdvantage password).
Enter your Realm. This is usually your company name in lowercase with no spaces, and is the same value ComplyAdvantage calls Company Name on their login screen.
In a separate browser tab, navigate to https://mesh.complyadvantage.com/settings/screening-configurations and select the Screening Configuration you want to use. Copy its ID and paste it into the Screening Configuration ID field in Proofdesk.
Choose whether you want Default ongoing monitoring for new screenings switched on or off. This only sets the default for new screenings - existing linked cases aren't changed, and you can always override it on a case by case basis.
Choose a Default Evidence Type. This is the evidence type that's pre-selected whenever you copy a ComplyAdvantage screening report into the Evidence tab in Proofdesk - you can still change it each time.
In your Proofdesk tab, copy the Webhook URL. In your ComplyAdvantage tab, navigate to https://mesh.complyadvantage.com/settings/webhooks and click New. Give it any name you like, for example Proofdesk - set the Event to Workflow completed and paste the Webhook URL into Target URL, then save it. Repeat this to create a second webhook for the Case stage updated event, using the same Webhook URL.
Back in Proofdesk, click Test Connection. Once it succeeds, click Save. If it fails, double check the details above, or contact us at team@proofdesk.com for help.
And that's it - you're all set up. Here's how to use it day to day.
Using ComplyAdvantage
Screening always happens at the entity level, not the relationship level. If you want to screen a customer relationship, you screen each of the entities within it - the customer themselves, and anyone else you've added, such as directors or beneficial owners.
Starting a screening case
Open the entity you want to screen and go to its Sources tab - this is where any of Proofdesk's data source integrations live, ComplyAdvantage included. You'll see a ComplyAdvantage card with a Create or Connect Case button.
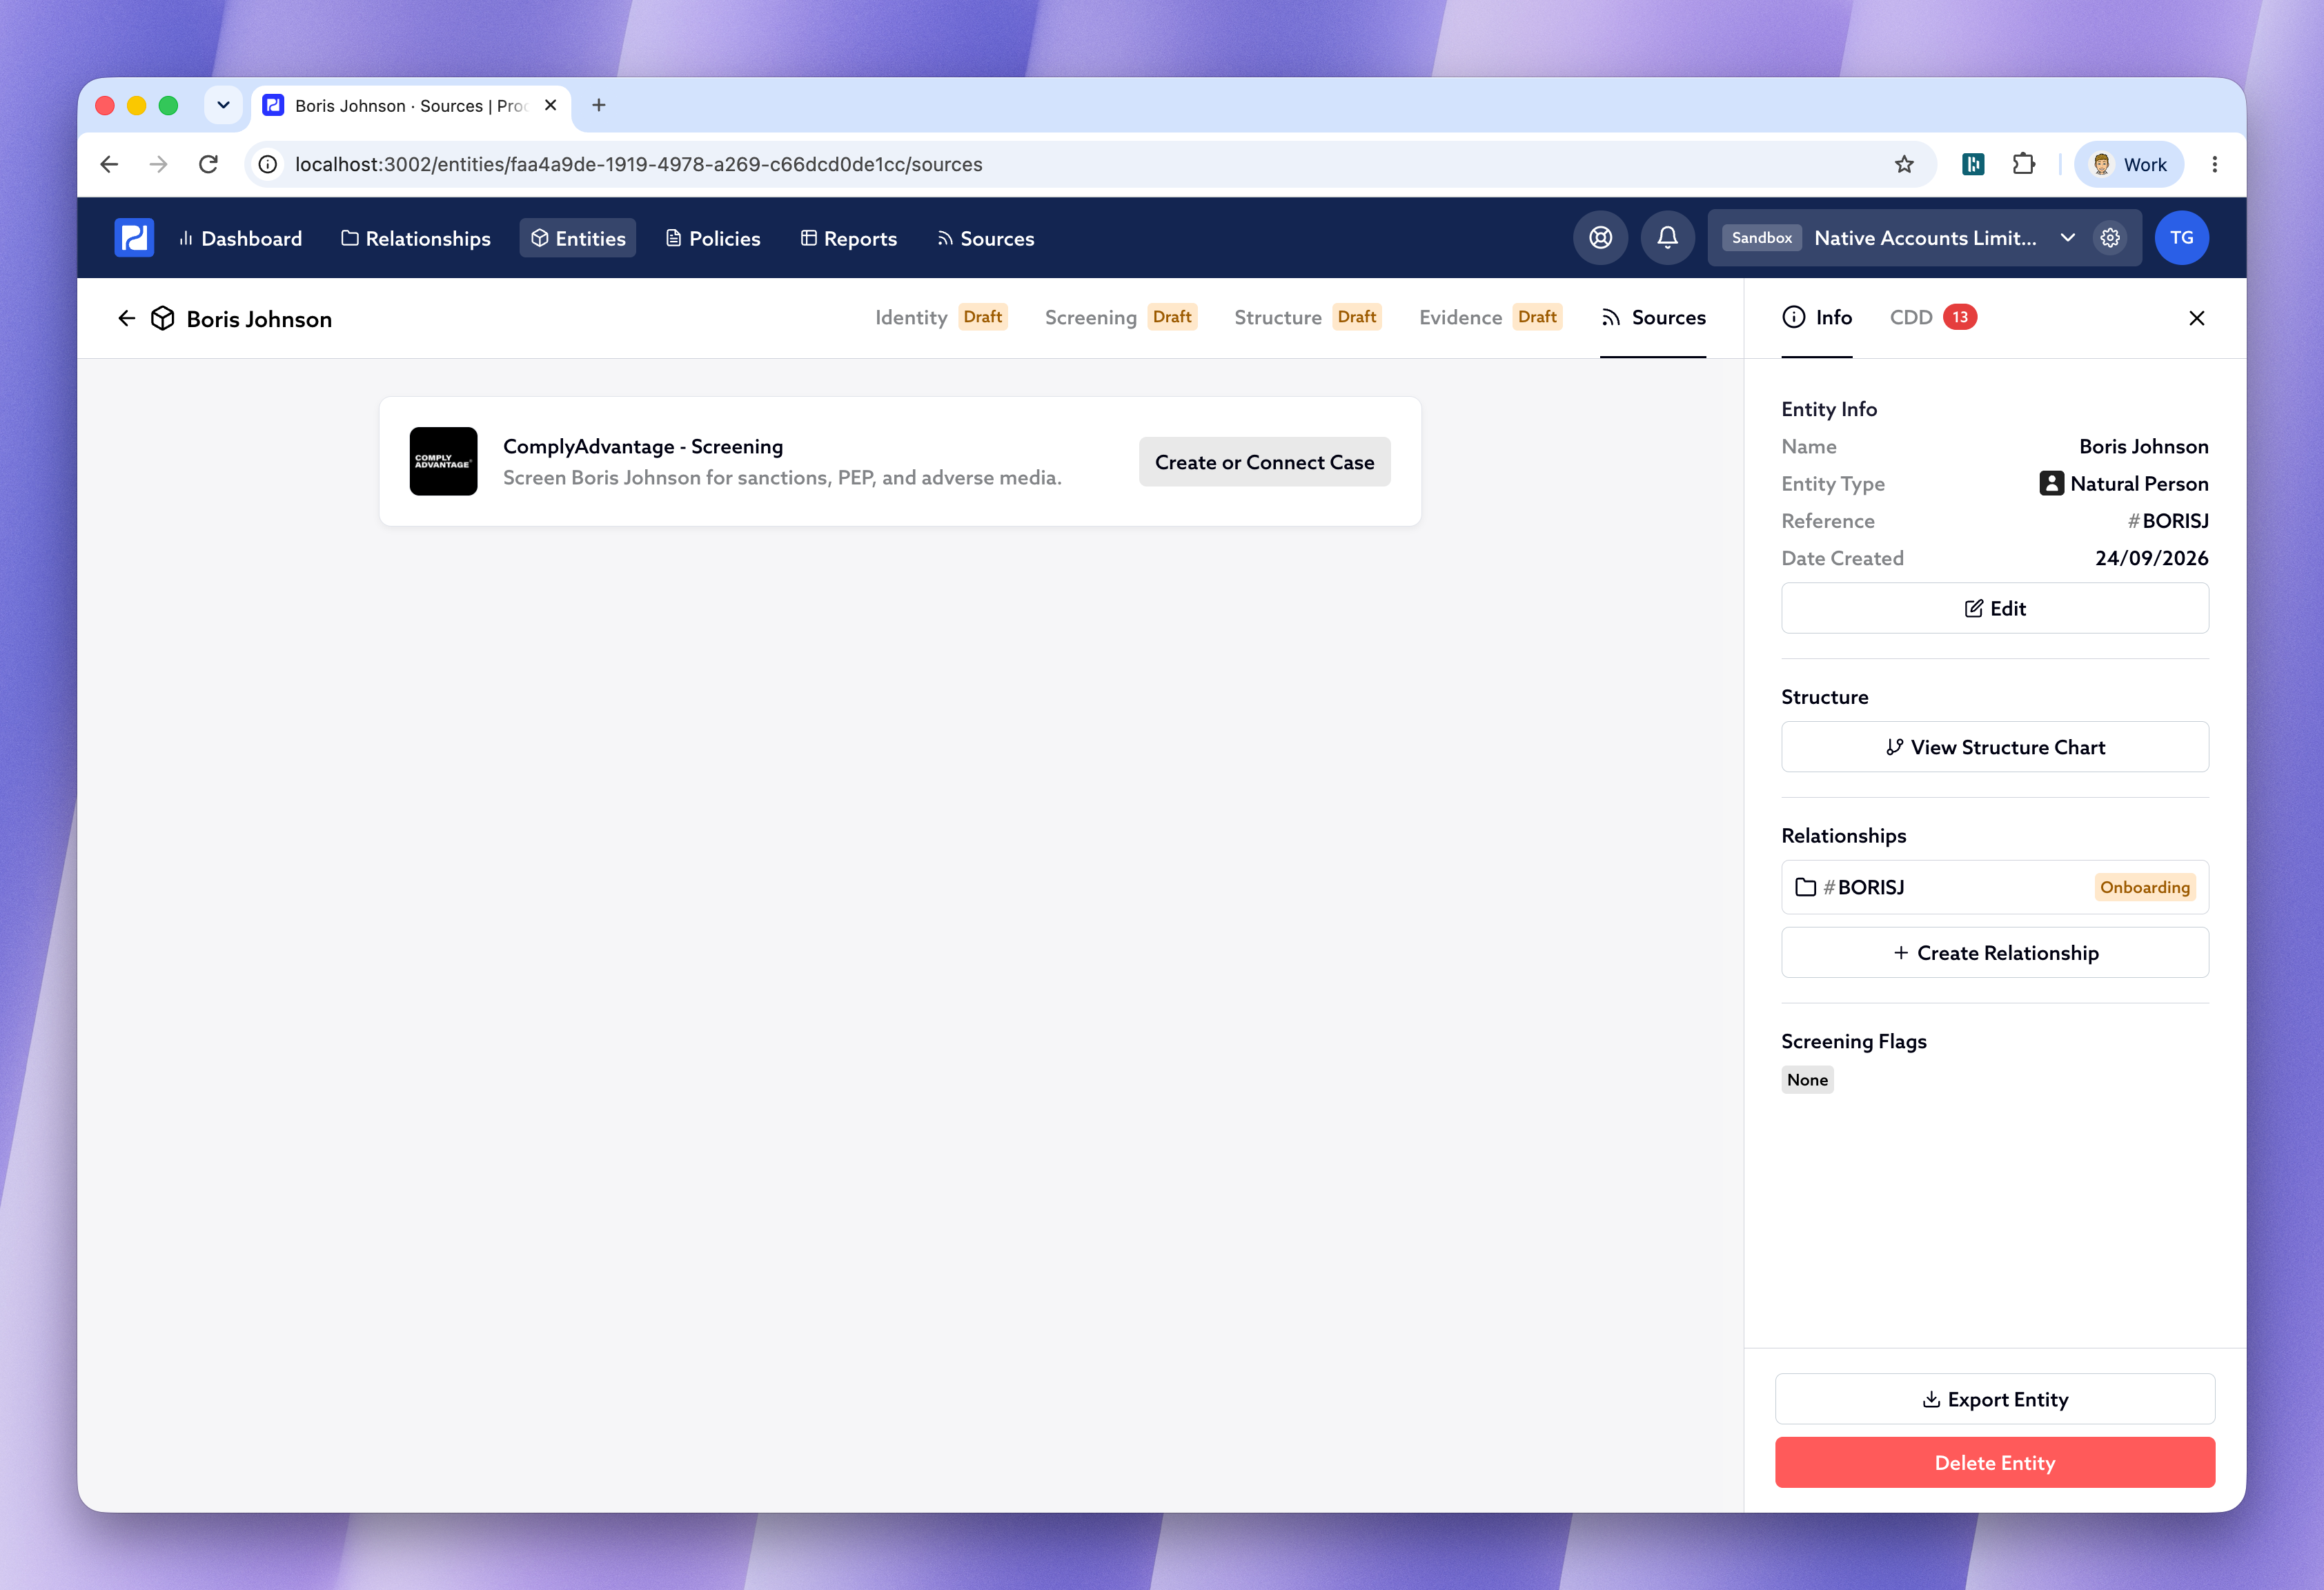
Clicking it gives you two options:
Create Case - starts a brand new screening case in ComplyAdvantage for this entity. Use this if you haven't screened them before.
Connect Case - links an existing ComplyAdvantage case to this entity instead of starting a new one. Use this if you've already been using ComplyAdvantage and want to link up cases you've already created there.
If you choose Create Case, Proofdesk pre-fills a customer identifier for ComplyAdvantage to use. This is based on the entity's Proofdesk reference (for example #BORISJ) - if that's already in use in ComplyAdvantage, we add a number onto the end to keep it unique. You can also toggle ongoing monitoring on for this specific case. This doesn't change your organisation's default setting - it only decides whether this one case is monitored going forward. When you're ready, click Run Screening.
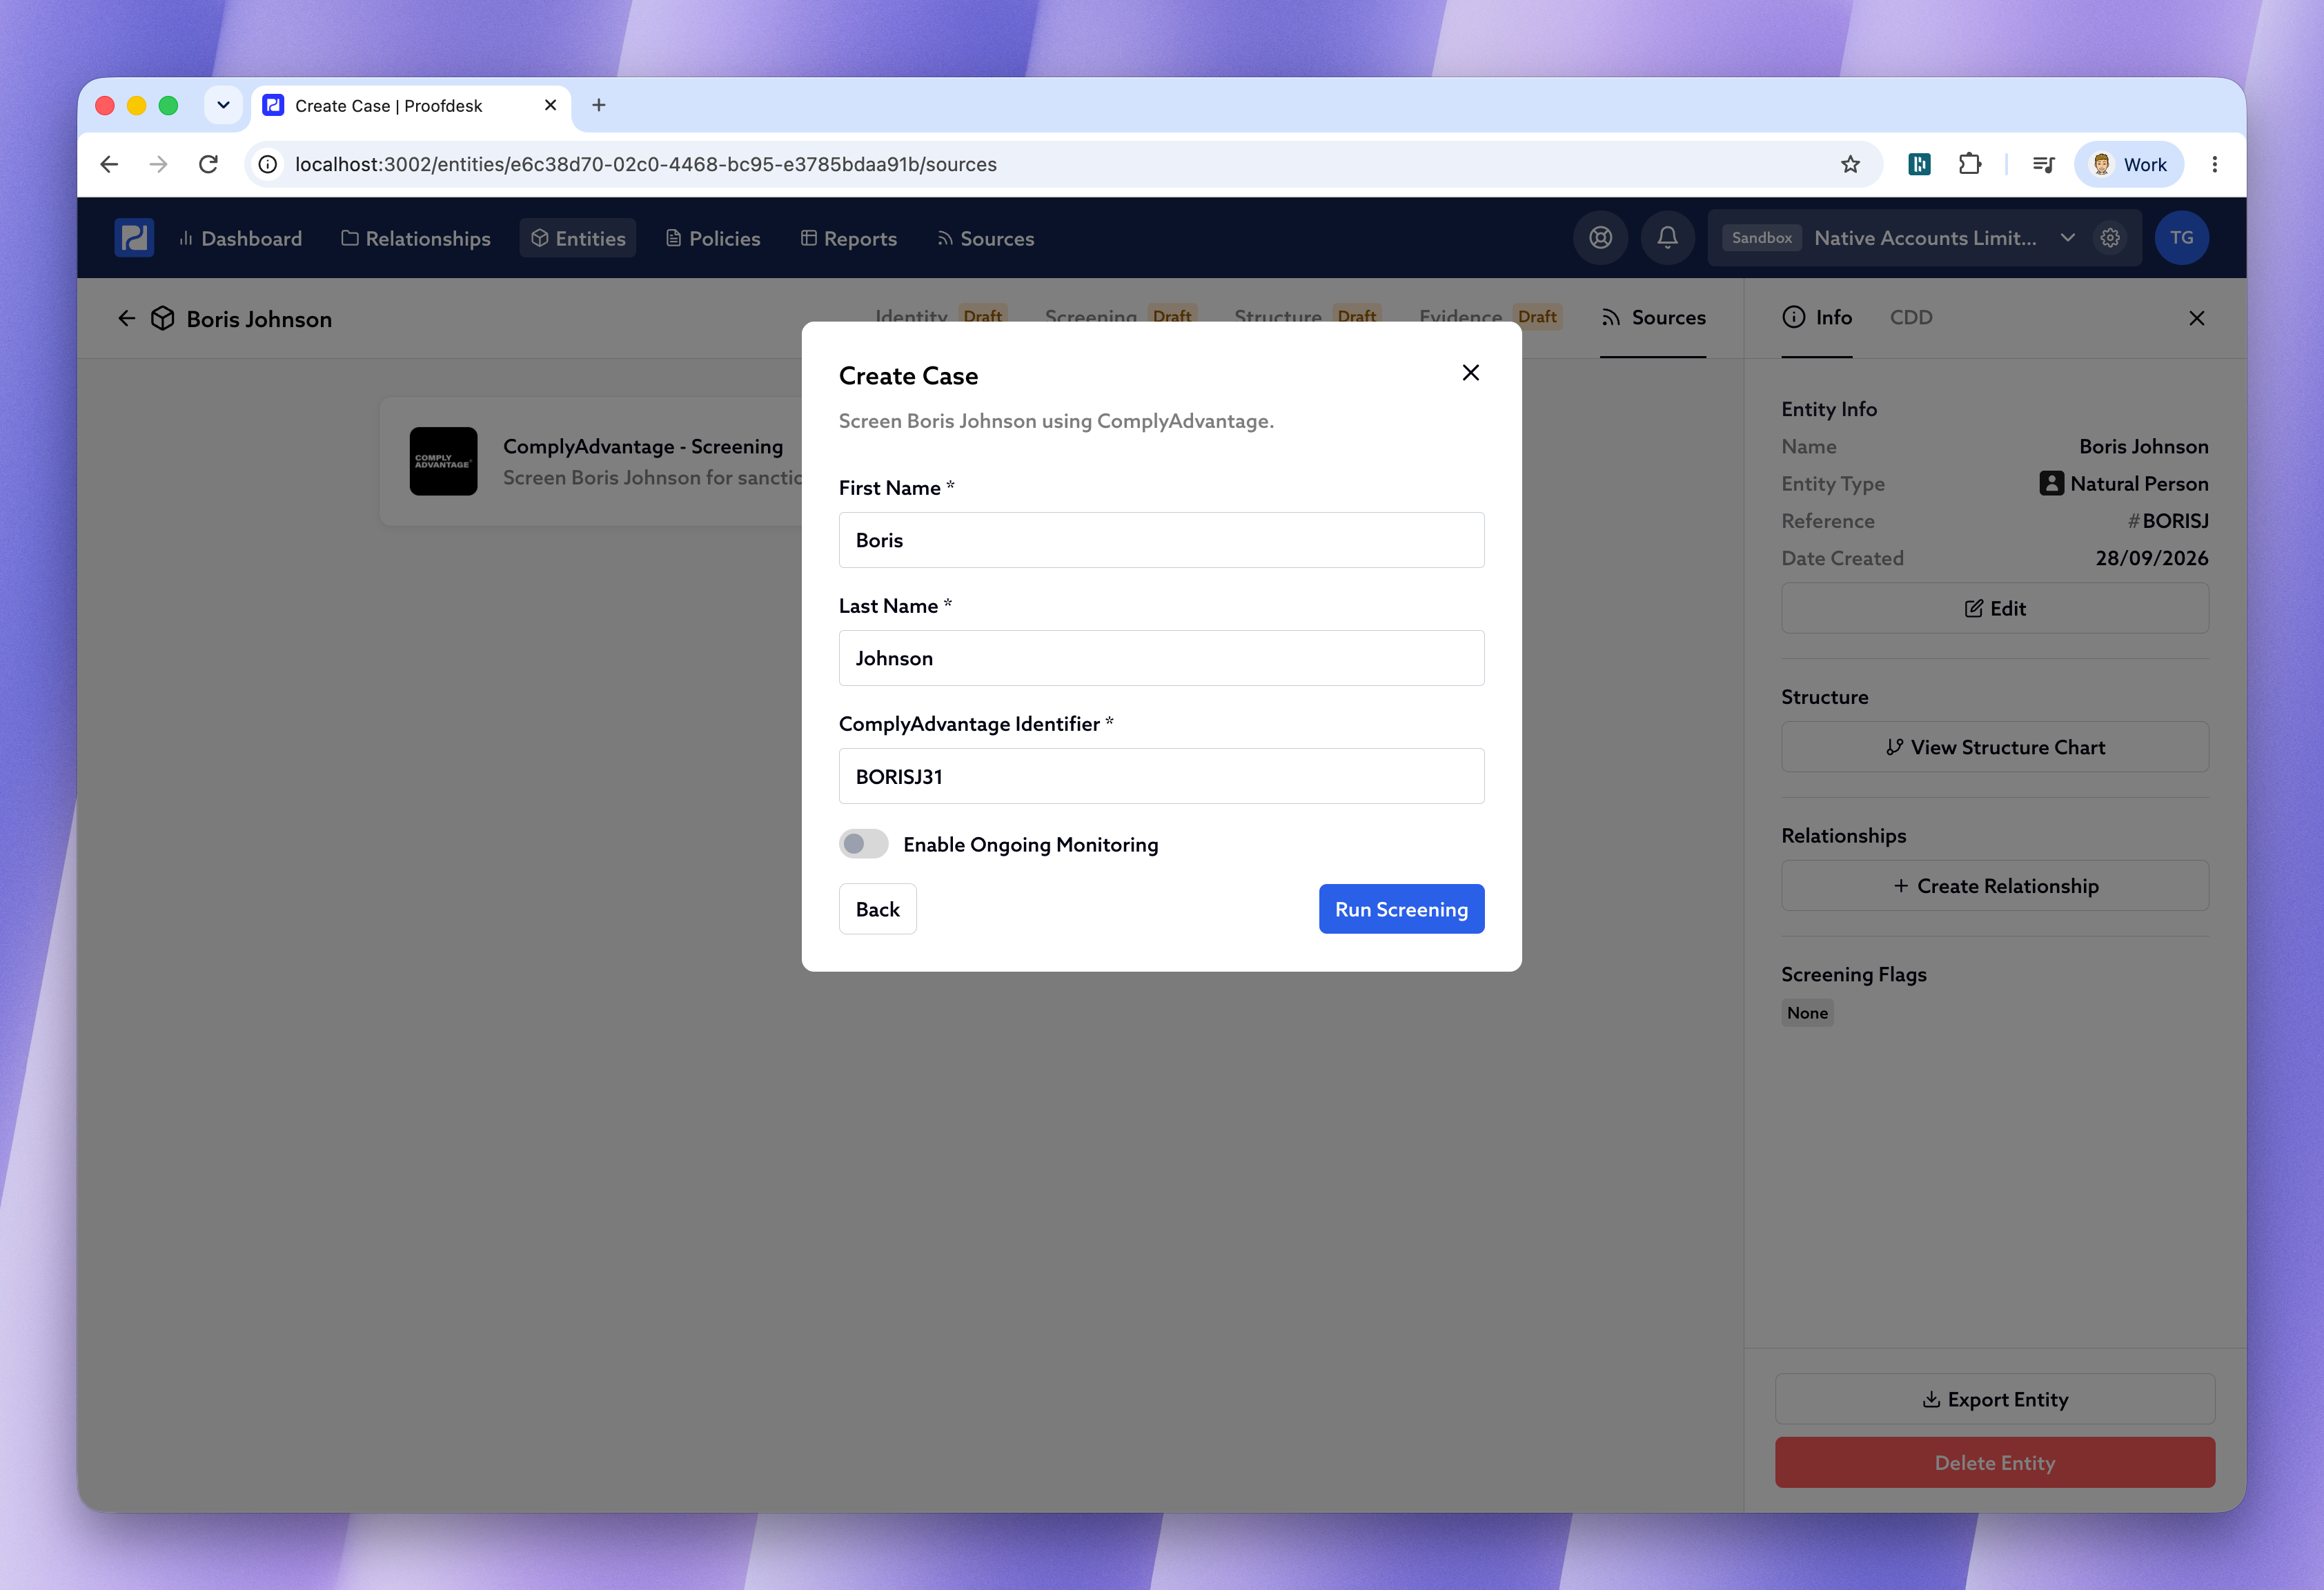
If you choose Connect Case instead, search for the case you want by name and select it from the list.
Reviewing potential matches
Once ComplyAdvantage has run the screening, the case moves into a Needs Action state and you'll see a notification appear next to Sources in the top navigation. If there are any potential matches to review, you'll be taken straight to a list of them.
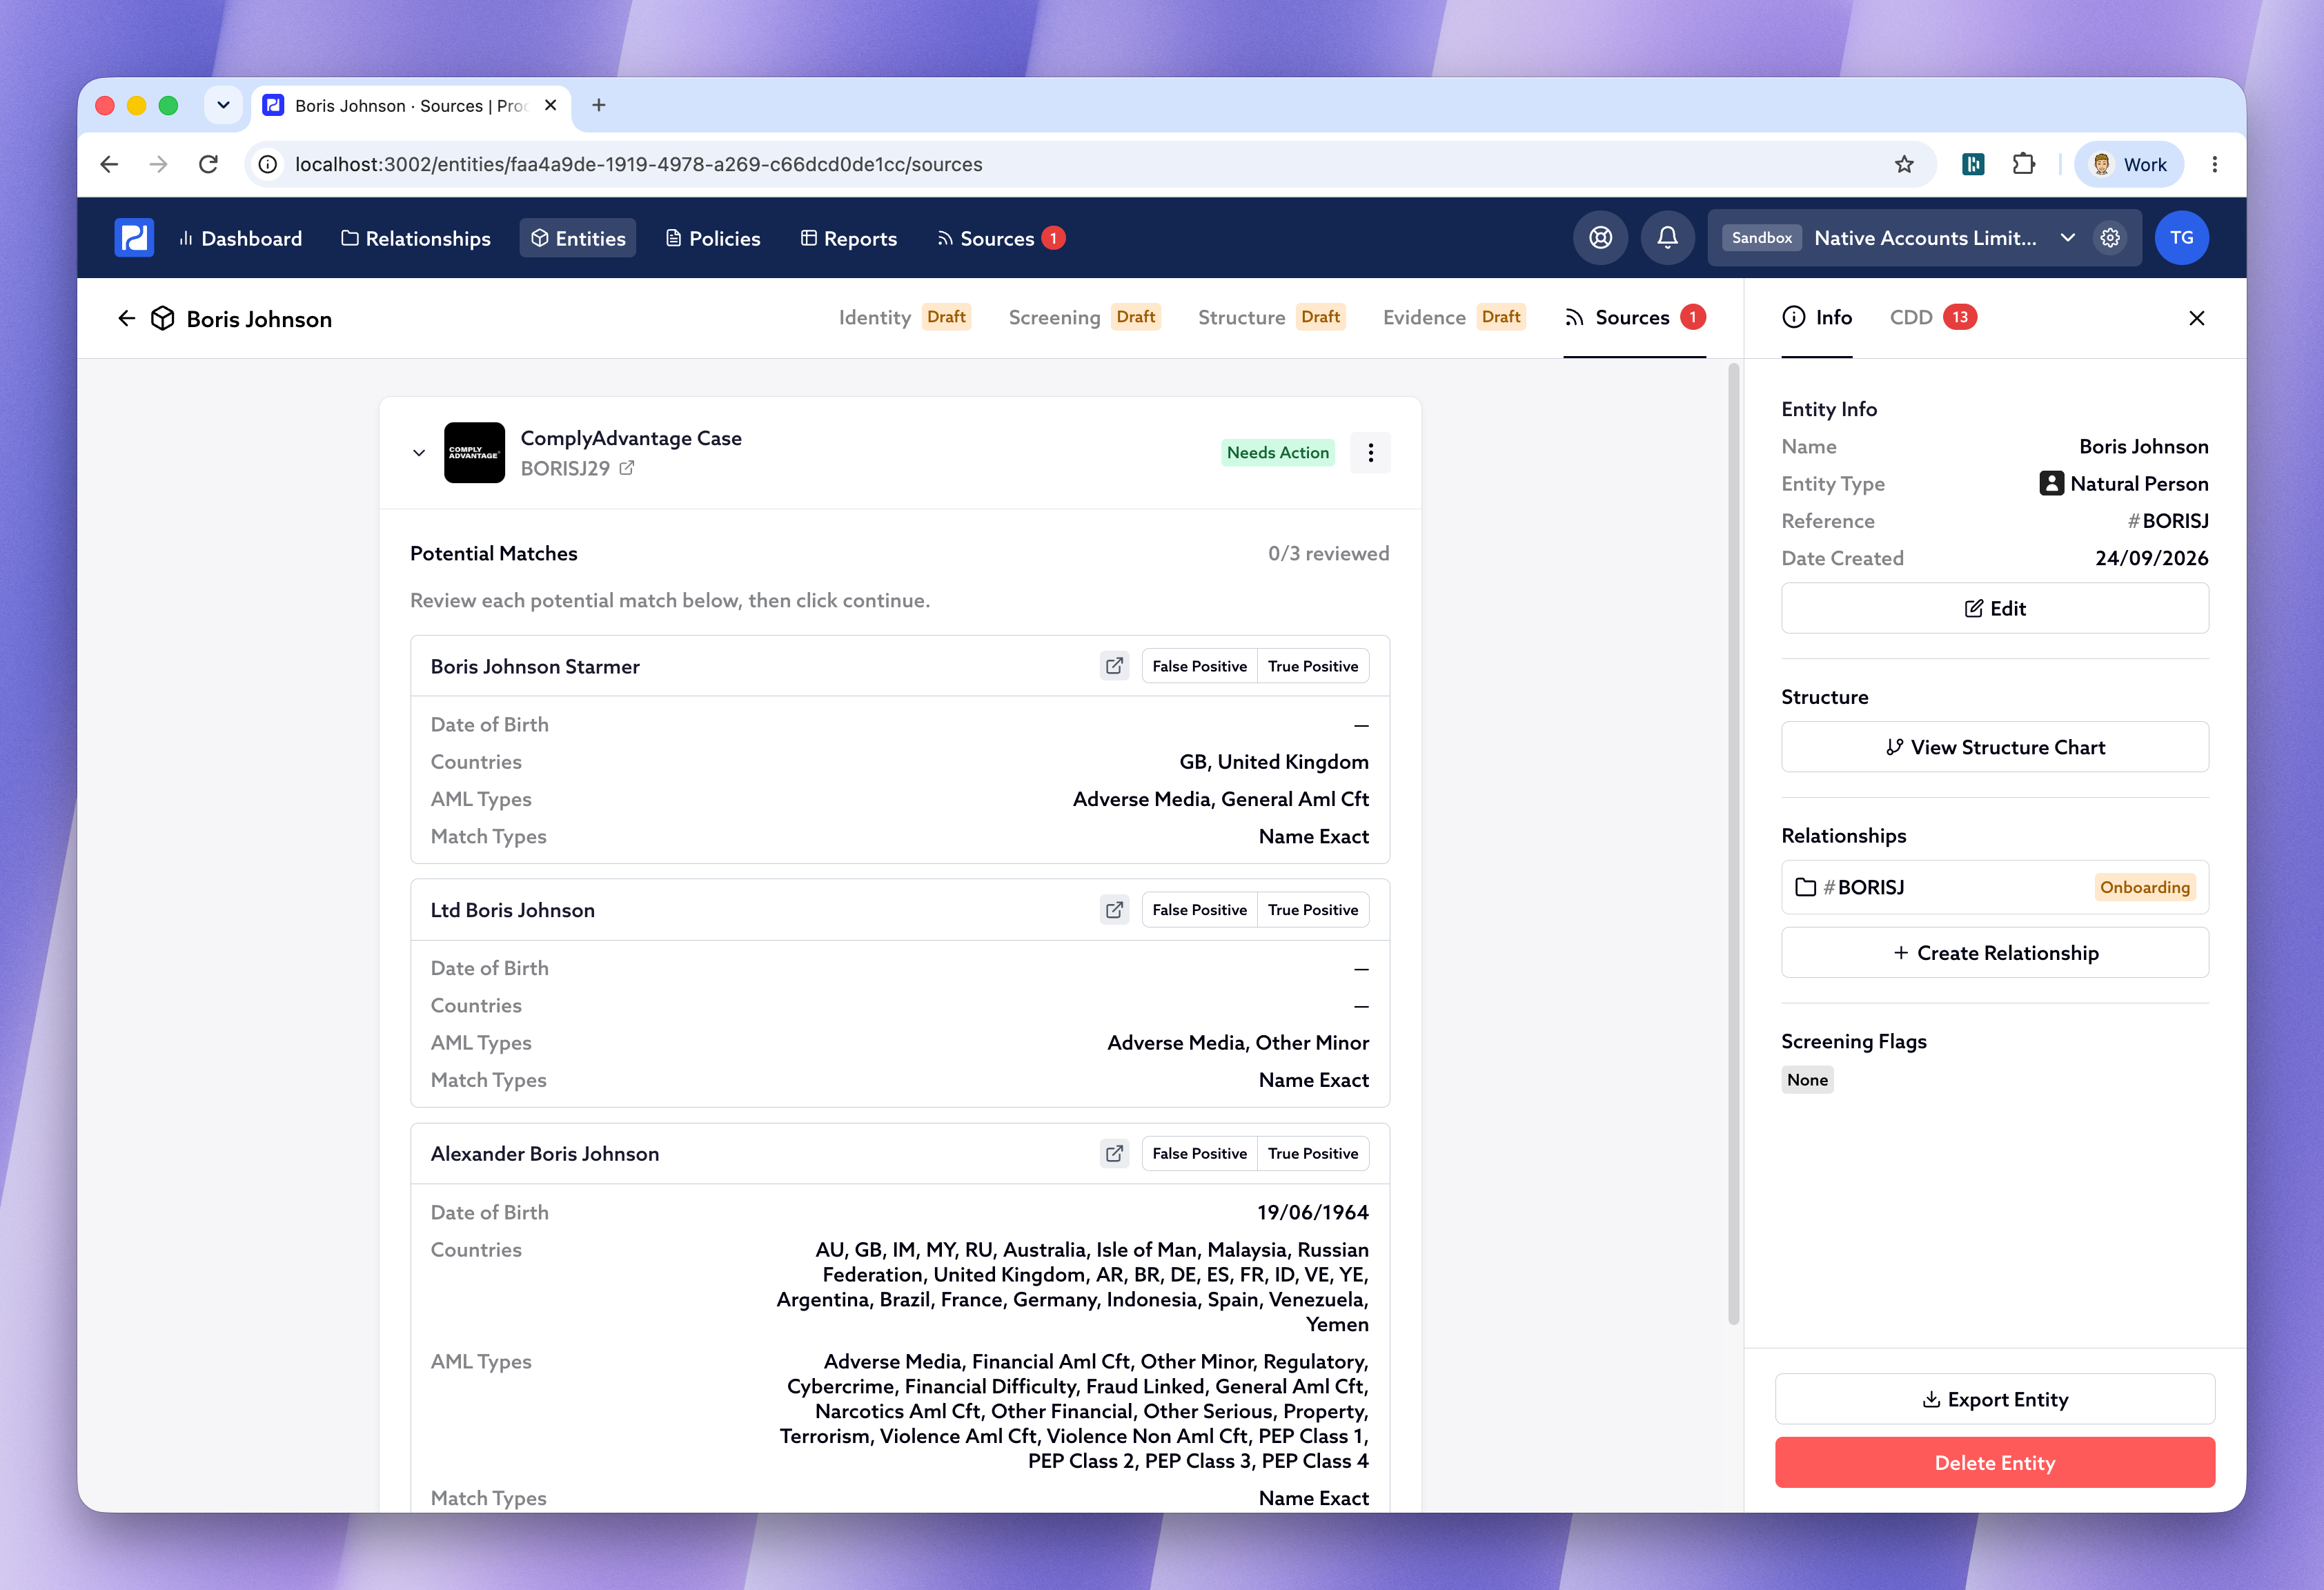
Each match shows the key details ComplyAdvantage found - enough for you to tell whether it's a genuine hit. If you need more detail, click the link icon to open the match directly in ComplyAdvantage.
For each match, mark it as either False Positive or True Positive, then click Continue once you've been through all of them.
You don't have to do this in Proofdesk. If you mark matches as false or true positives directly in ComplyAdvantage instead, switching back to the Proofdesk tab will pick up those decisions automatically.
If ComplyAdvantage doesn't find any potential matches at all, this step is skipped and you're taken straight to the finished report - the report will tell you how many potential matches there were.
Bringing the results into Proofdesk
Once every match has been reviewed, ComplyAdvantage generates the final screening report and Proofdesk shows you the outcome - whether the entity is flagged as a PEP, for sanctions, or for adverse media.
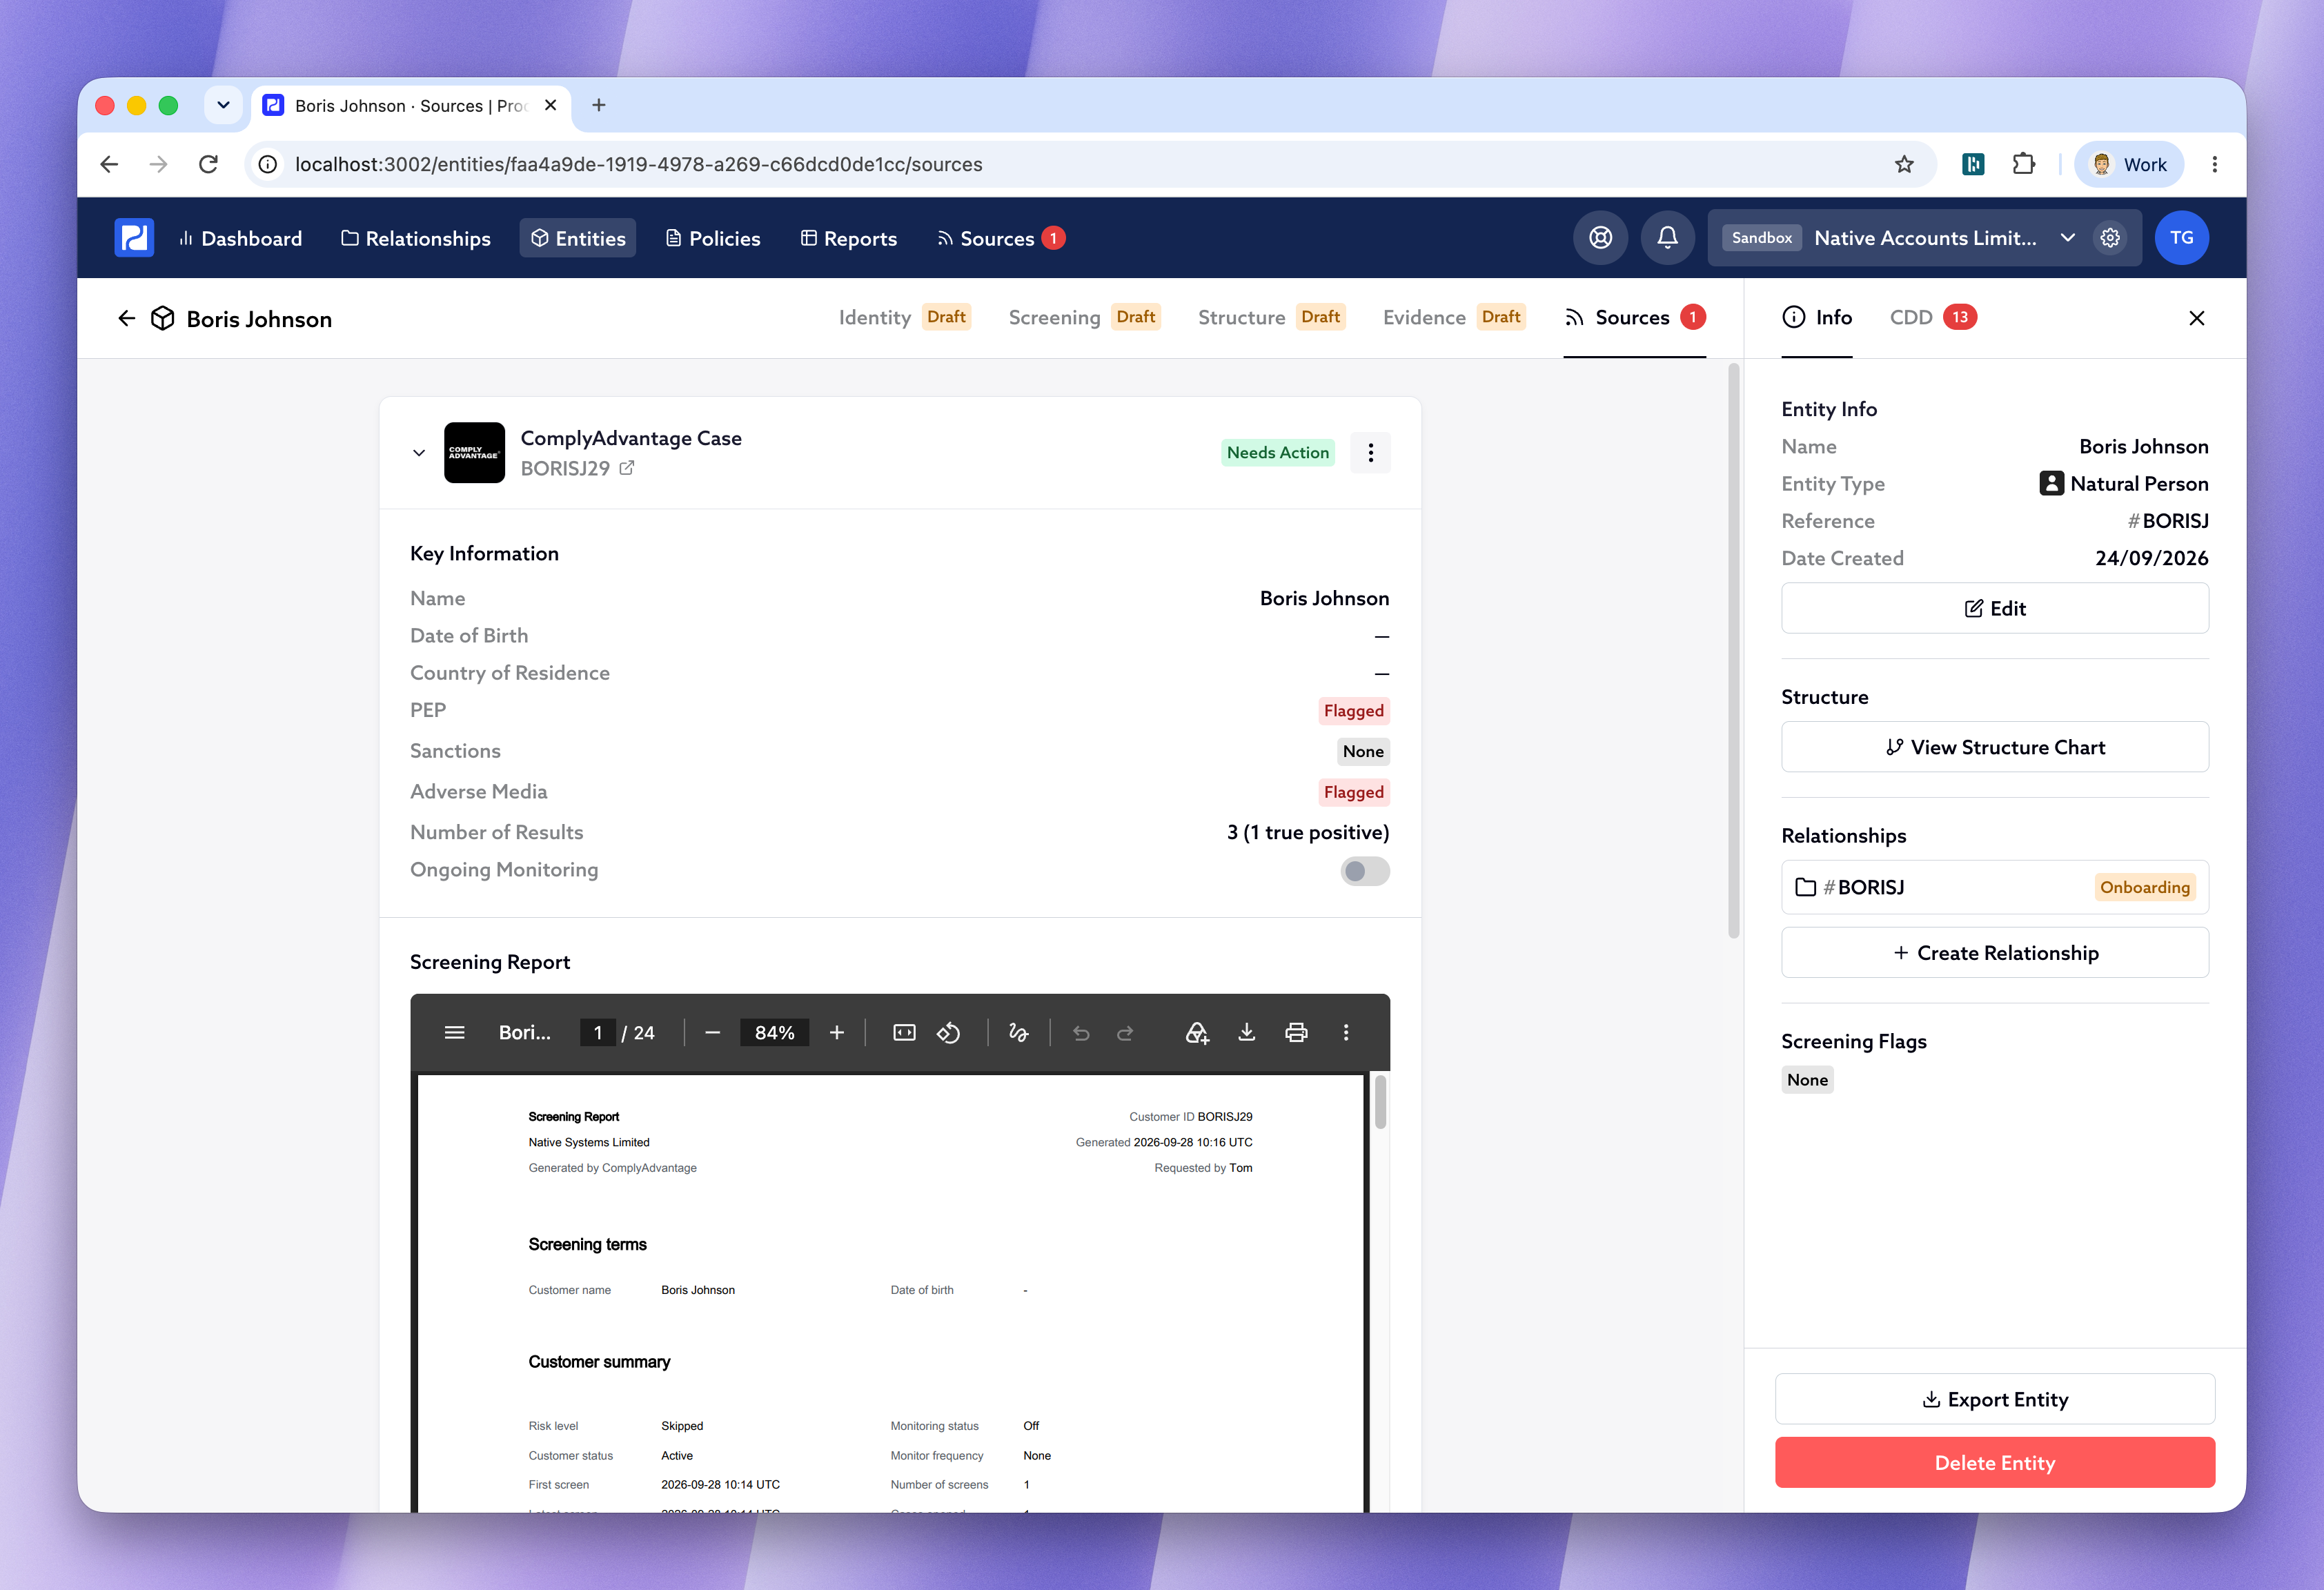
From here, click Copy to Entity Forms to bring the results into the entity's own Screening form and, if you want, into Evidence too. The Sources tab holds the raw ComplyAdvantage case, while the Screening form is where you record, in your own words, the outcome of the screening you carried out.
Clicking Copy to Entity Forms opens a Proposed Changes window, showing you exactly what would change on the Screening form (for example, updating PEP Status from empty to Foreign), and underneath, an option to copy the ComplyAdvantage screening report into Evidence. Untick anything you don't want copied across, or click directly into a field to change it yourself before confirming - for example, if you'd rather record someone as a Domestic PEP than a Foreign one.
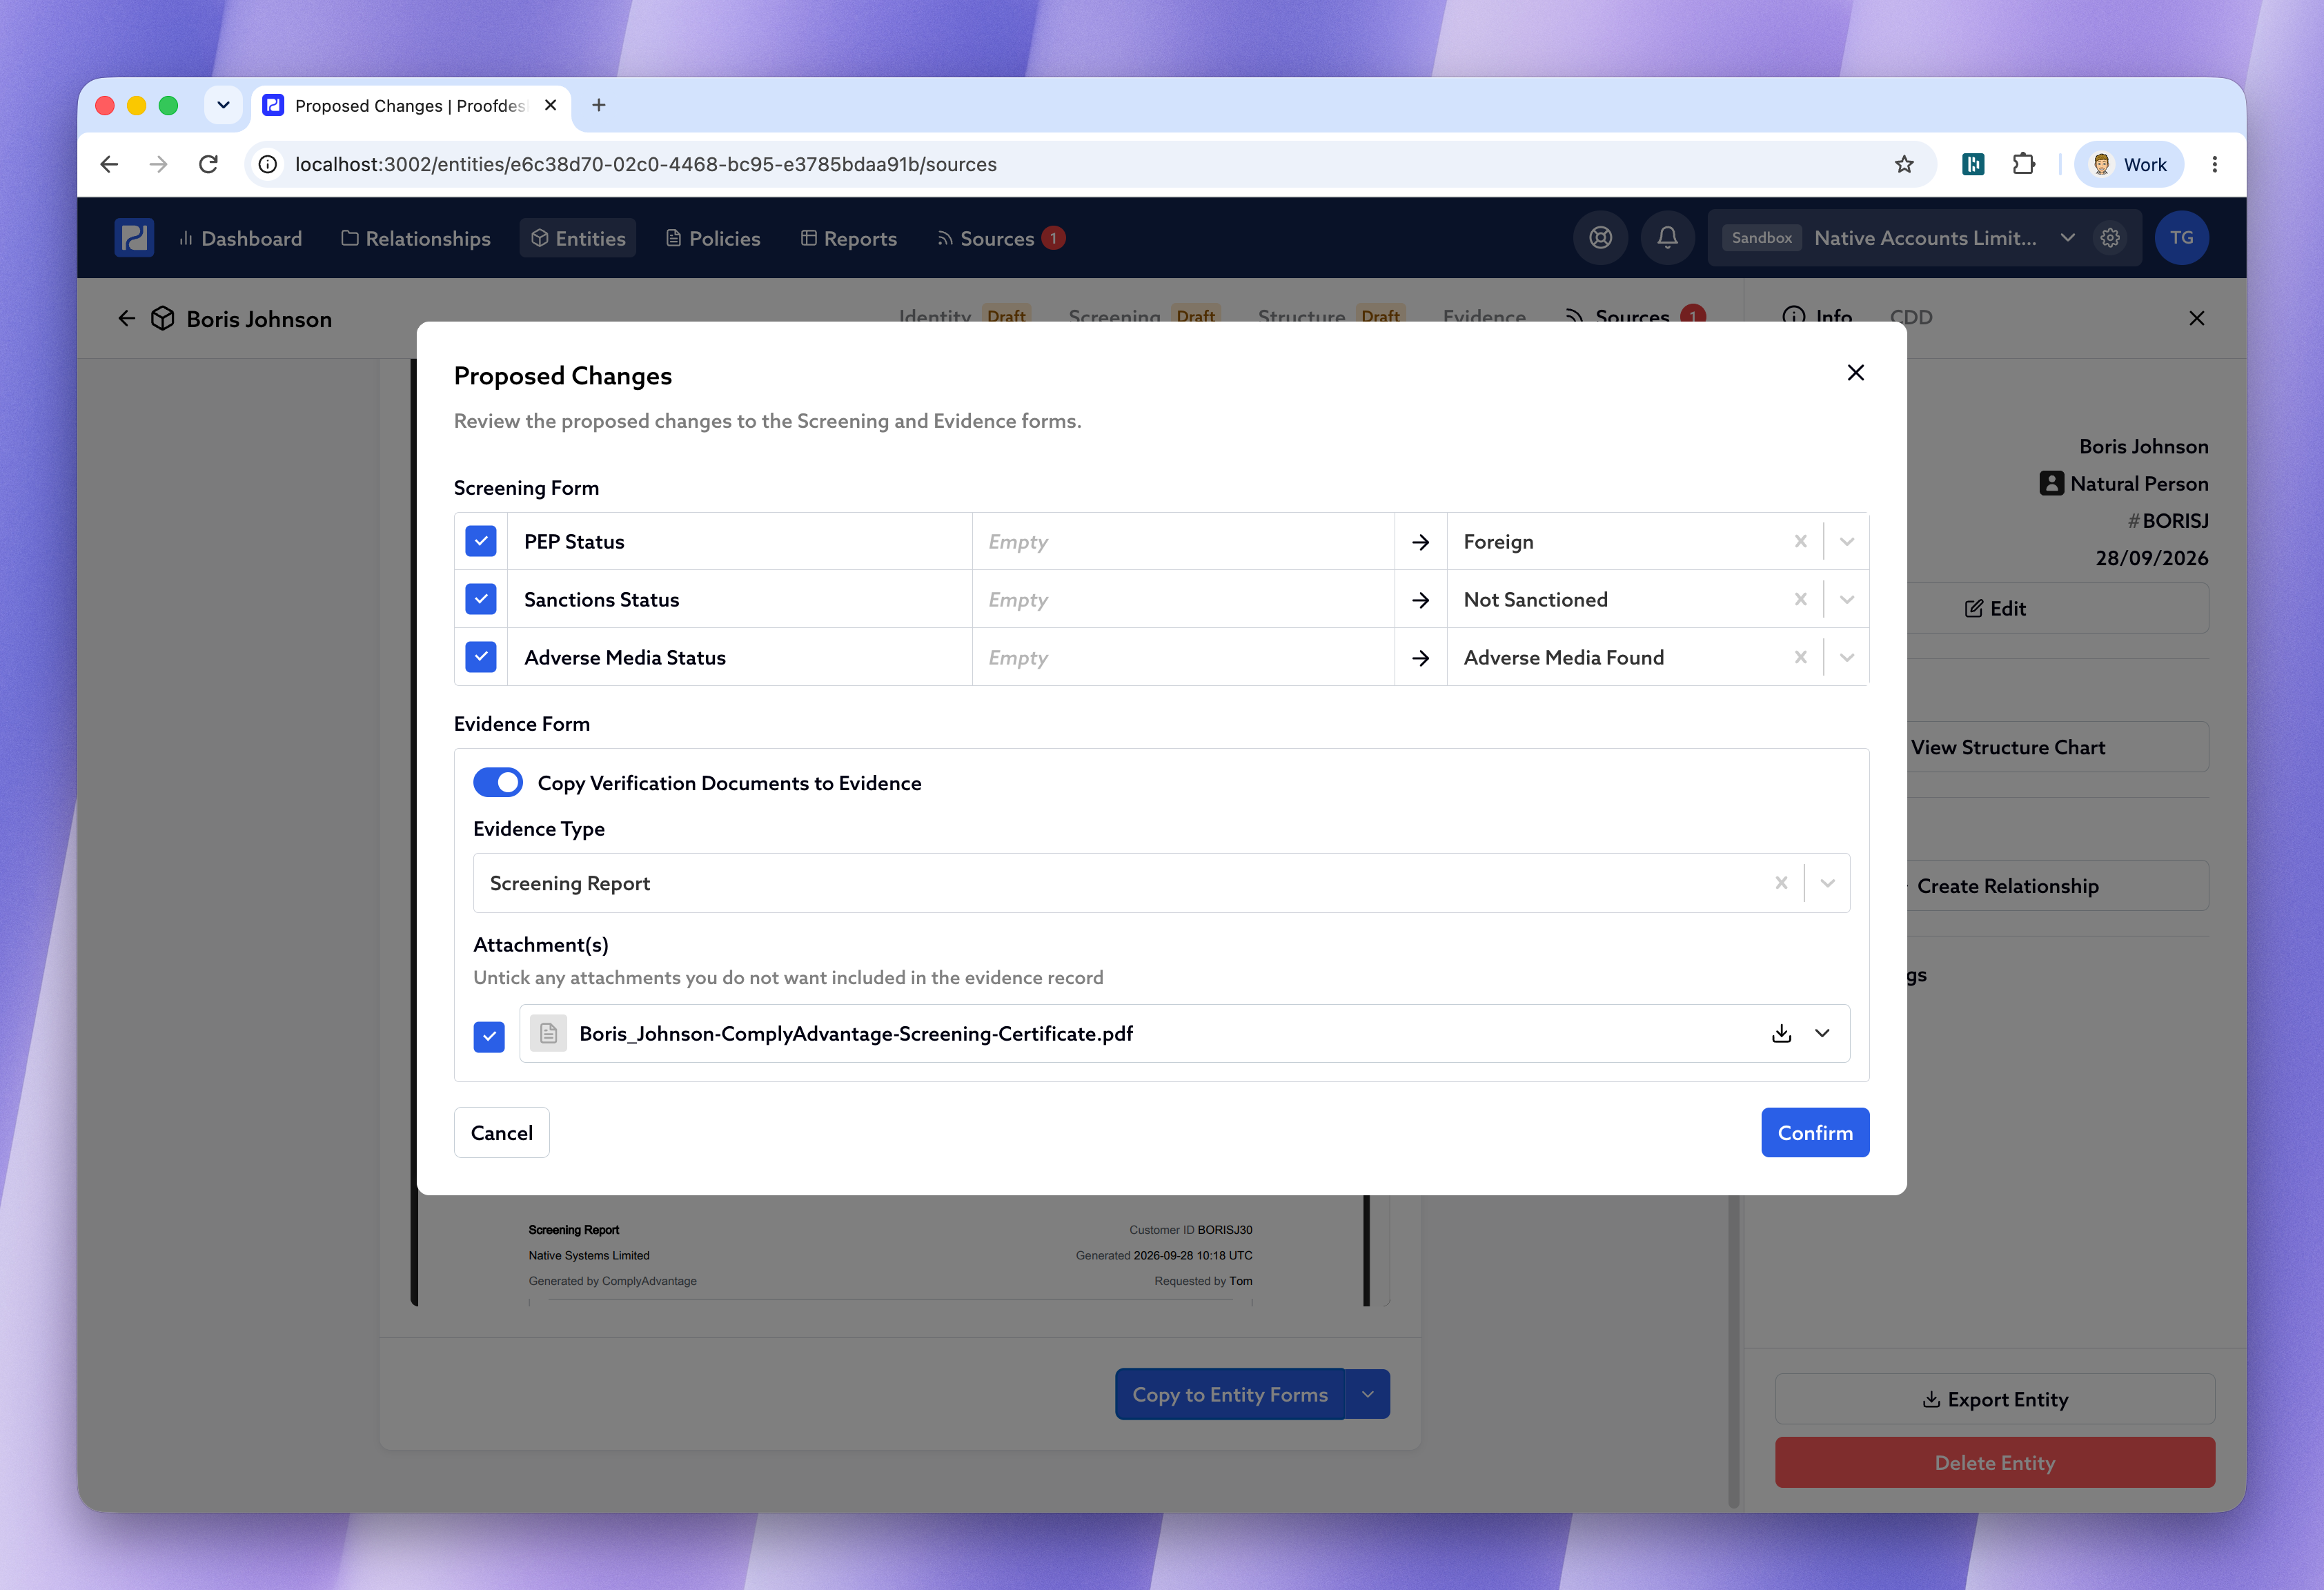
Click Confirm and Proofdesk tells you exactly what's been updated.
If your Screening and Evidence forms are already up to date - because you've recorded the outcome manually, or from an earlier screening - you don't need to copy anything across again. Instead, use the small arrow next to Copy to Entity Forms and choose Skip and Mark as Completed.
Keeping track of your screenings
Every ComplyAdvantage case you create or connect also appears in the main Sources tab in the top navigation, alongside any other data sources you use. This gives you one place to see everything that's outstanding, whichever entity it belongs to.
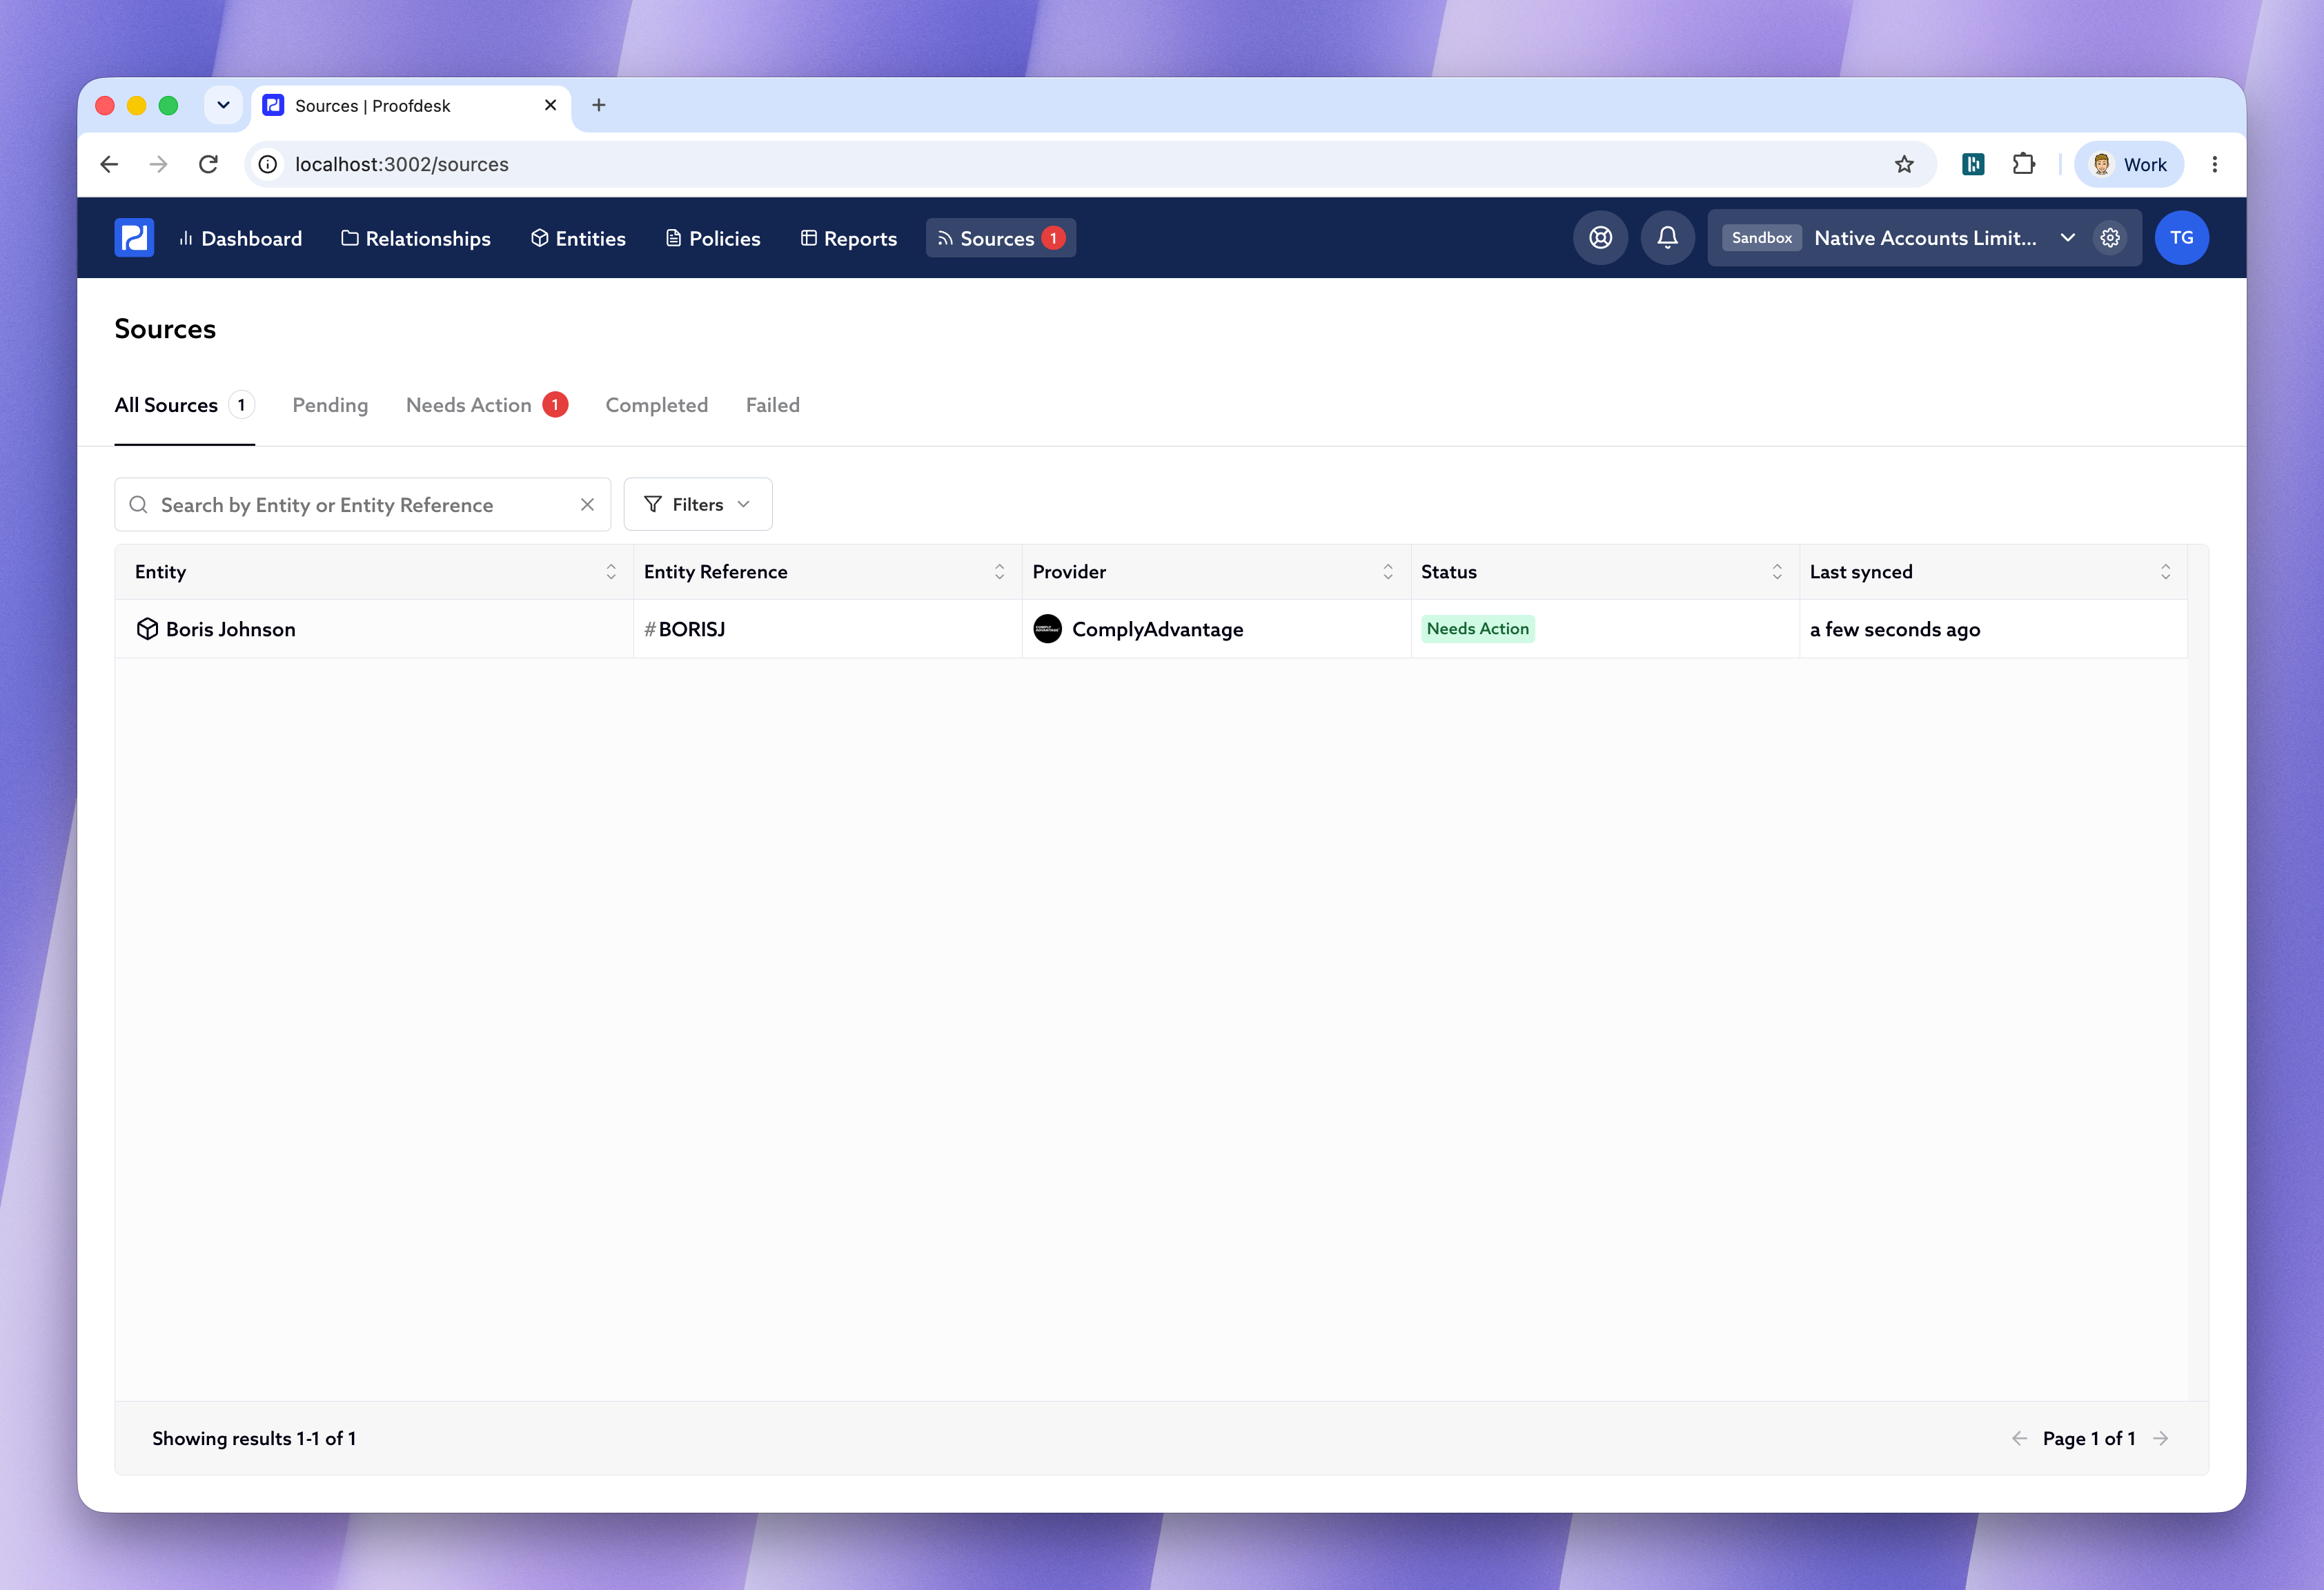
Cases move through a few statuses:
Pending - ComplyAdvantage is still running the search. For ComplyAdvantage this is usually only a few seconds; other data sources can take longer.
Needs Action - the results are in and something needs your attention, such as reviewing a potential match.
Completed - there's nothing outstanding.
Failed - something went wrong. Start the case again.
If ongoing monitoring is switched on for a case and ComplyAdvantage later flags a new potential match, the case moves from Completed back to Needs Action automatically, and you'll see the notification reappear.
Connecting an existing case
If you've already been using ComplyAdvantage and want to link up your existing cases rather than starting fresh, choose Connect Case from the same Create or Connect Case button, then search for and select the right case.
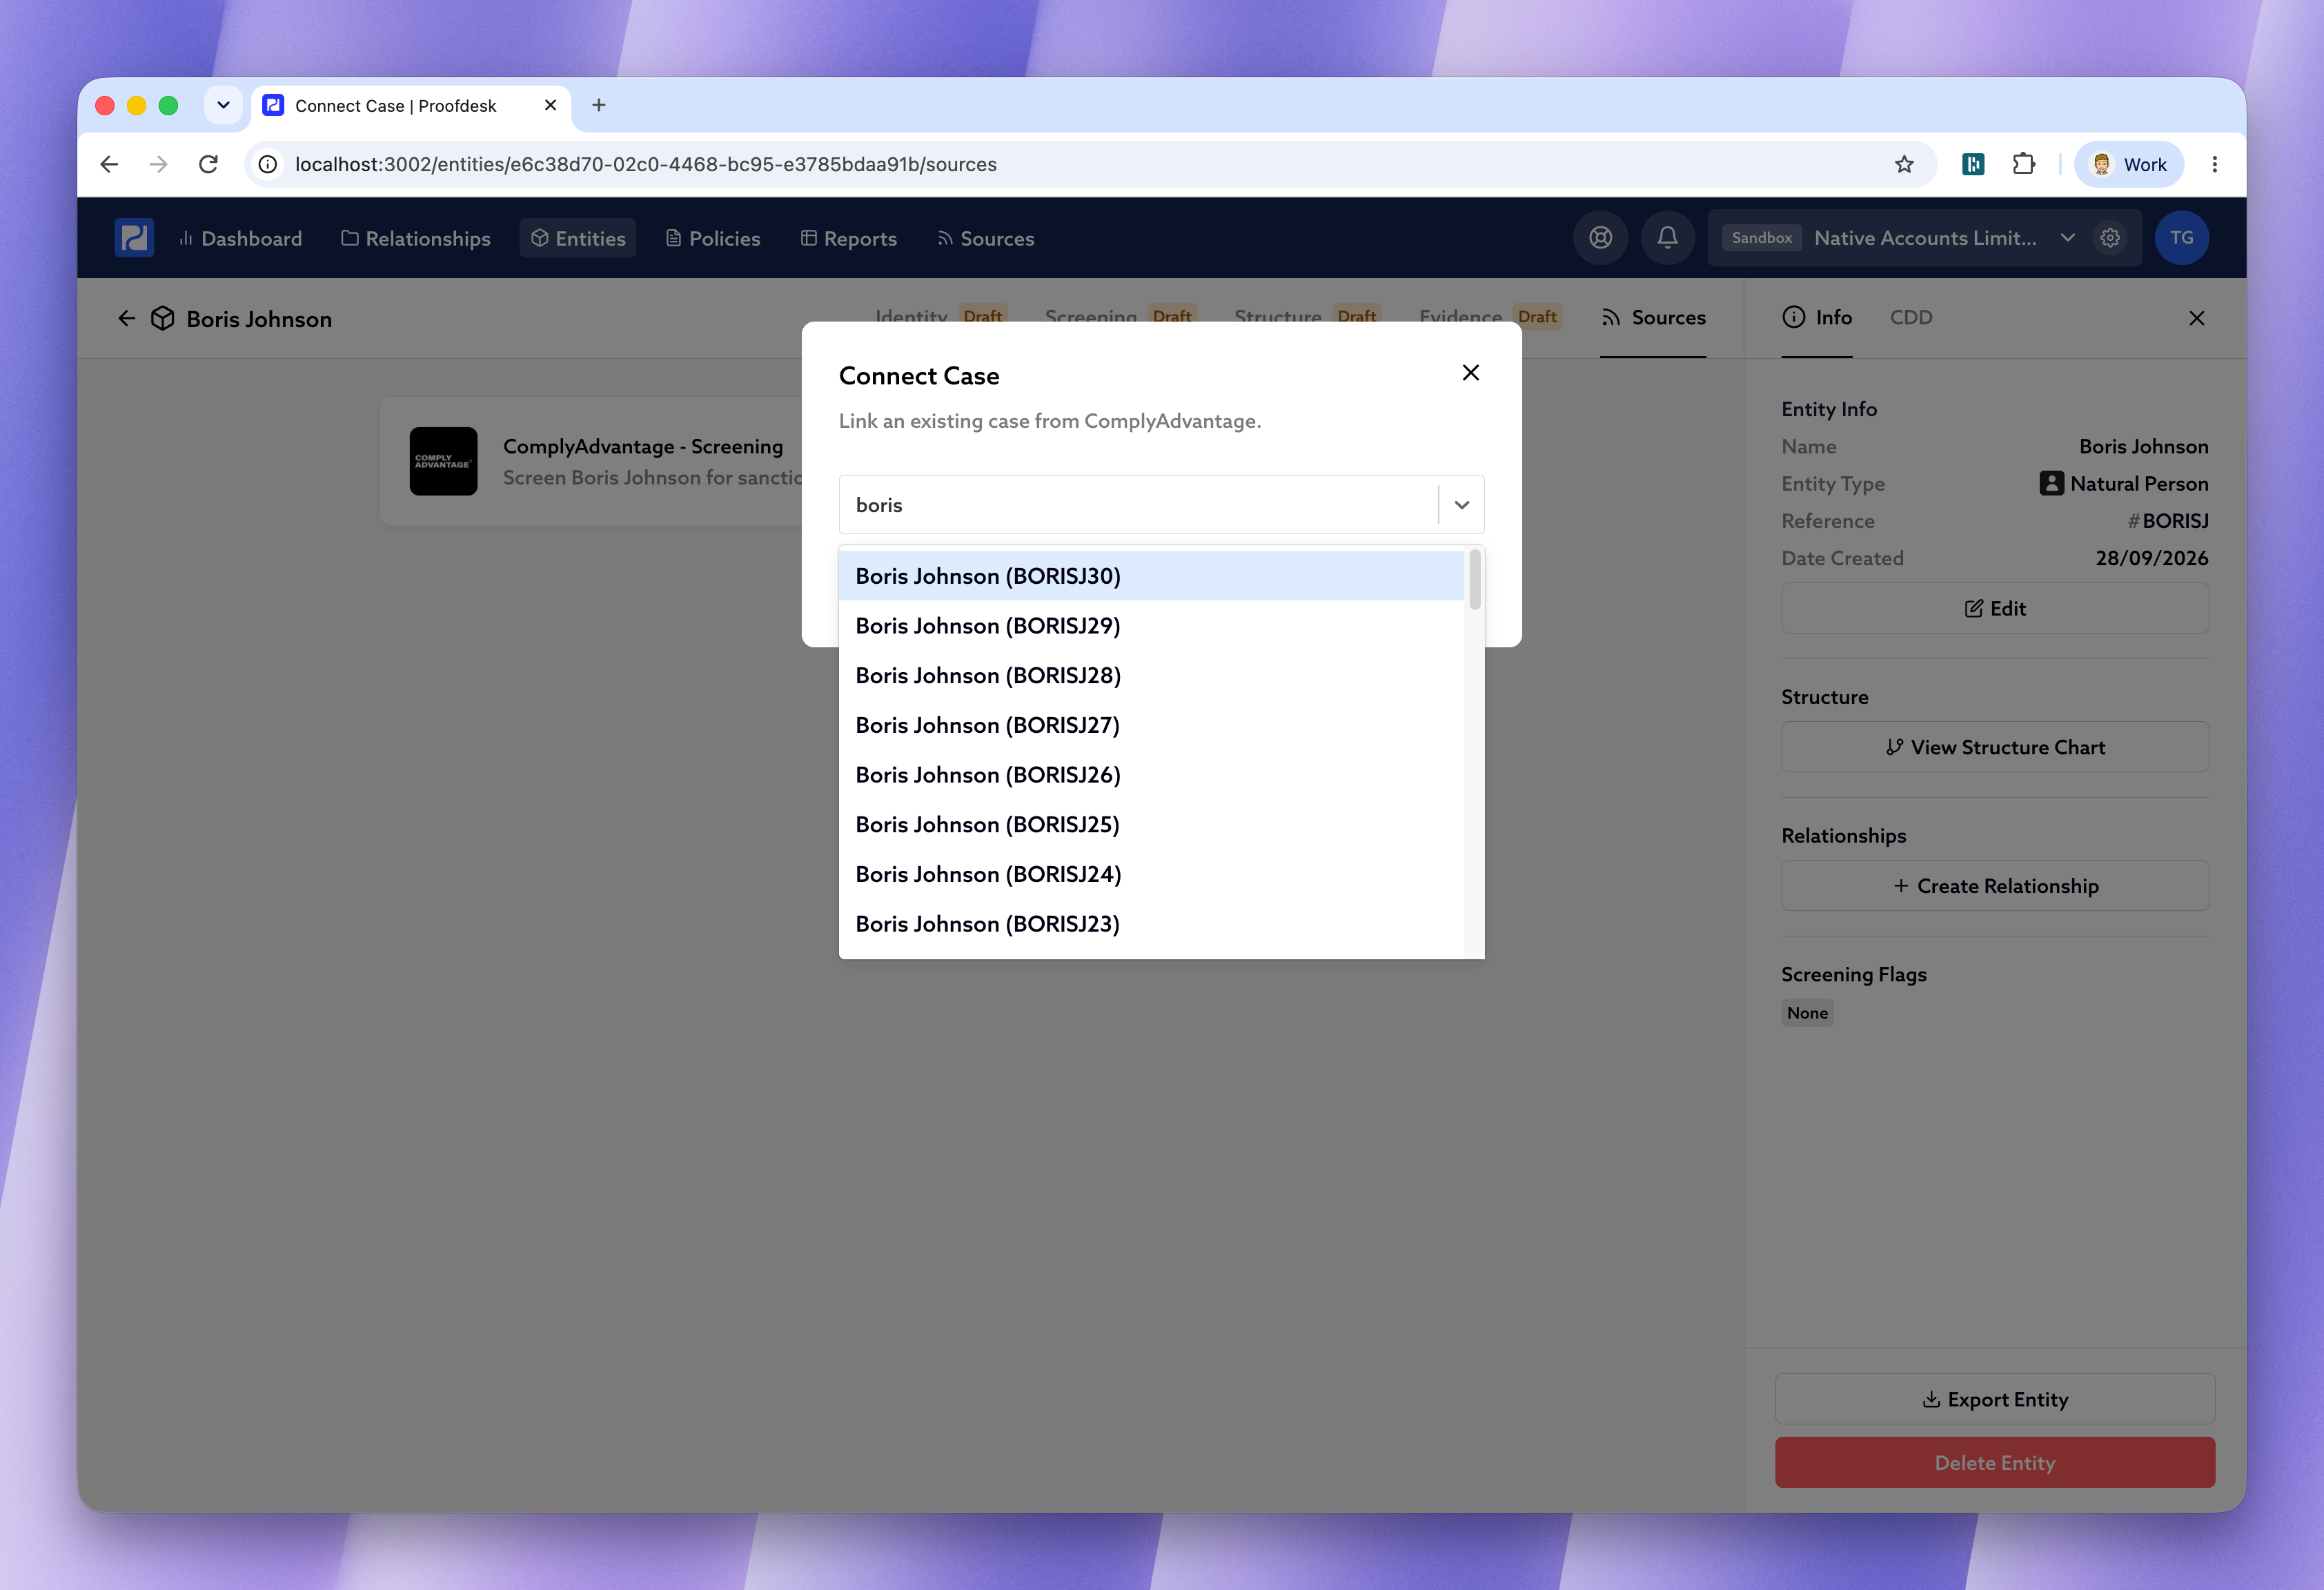
From here, the flow is exactly the same as above. If you've already marked matches as false or true positives in ComplyAdvantage, those decisions will already be filled in when you reach the potential matches screen - you'll just need to click Continue.