3. Adding Customer Due Diligence
With the Relationship Details form complete, it’s time to focus on your customer. In this step, you’ll collect and verify their CDD (Customer Due Diligence). Proofdesk guides you through the process using your organisation’s Identity Policy, so you always know what’s required and what’s still missing.
The Customer section
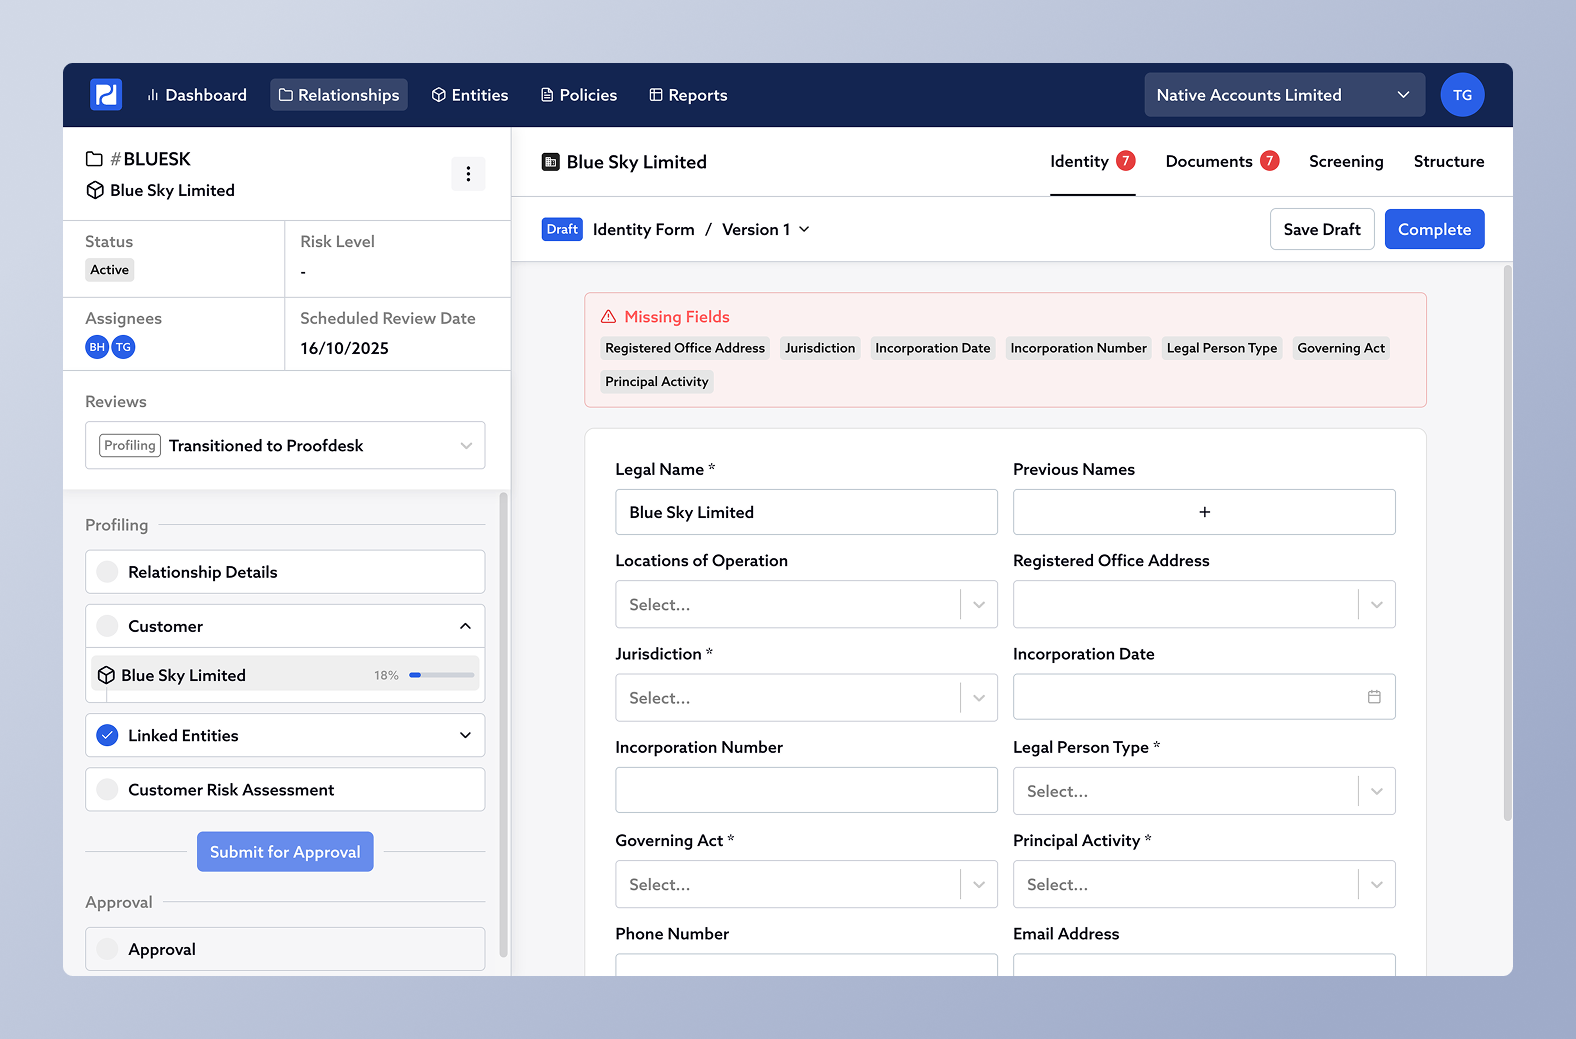
Back in the Review sidebar, the next section is Customer. It lists the customer entity you selected when establishing the relationship. When you click it, you’ll see a view that looks very similar to the main Entities page but this one is shown in the context of the current Relationship. That means you’re viewing the customer’s forms as they apply to this onboarding, not in isolation.

Entities are reusable
Every person, company, trust, or foundation only ever exists once in Proofdesk. So if Blue Sky Limited is your customer in one relationship and also a shareholder in another, you’ll only have one record for them, their forms and documents are shared everywhere they appear.
When you update an entity’s information, that update is instantly available anywhere else they’re connected. This avoids duplication and ensures your CDD stays consistent across all relationships.
Smart CDD Progress
Next to the customer’s name in the sidebar, you’ll see a progress bar showing the percentage of CDD collected and verified for that entity. This percentage is calculated automatically based on your firm’s Identity Policy, which defines what information and documents are required for each type of entity (e.g. company, trust, individual).
As you fill in forms and upload documents, you’ll see the progress bar increase and the list of missing items shrink.
When all mandatory fields and verifications are complete, the progress bar reaches 100% and the Customer section in the checklist gets a ✅ tick.
The Identity Form
Click the Identity tab at the top of the customer’s page to view their core information. This form captures the basic facts about the entity such as name, address, date of birth or incorporation, and so on.
Above the form you’ll see a Missing CDD Fields list. This is a live list of any required fields that haven’t yet been completed, based on your firm’s Identity Policy. As you fill in each field and click Save Draft, those warnings will disappear and the Smart CDD progress bar will update. You can still complete the fields that aren't mandated by your Identity Policy.
Each firm's forms will be slightly different, with different fields configured based on that firm's approach to AML/CFT. Don't worry if you see different options in our screenshots than you see in Proofdesk.
When you’ve completed the form, click Complete to lock it as a record. You can always reopen it later using New Version while the Review is still in the Profiling stage.
Verification Documents
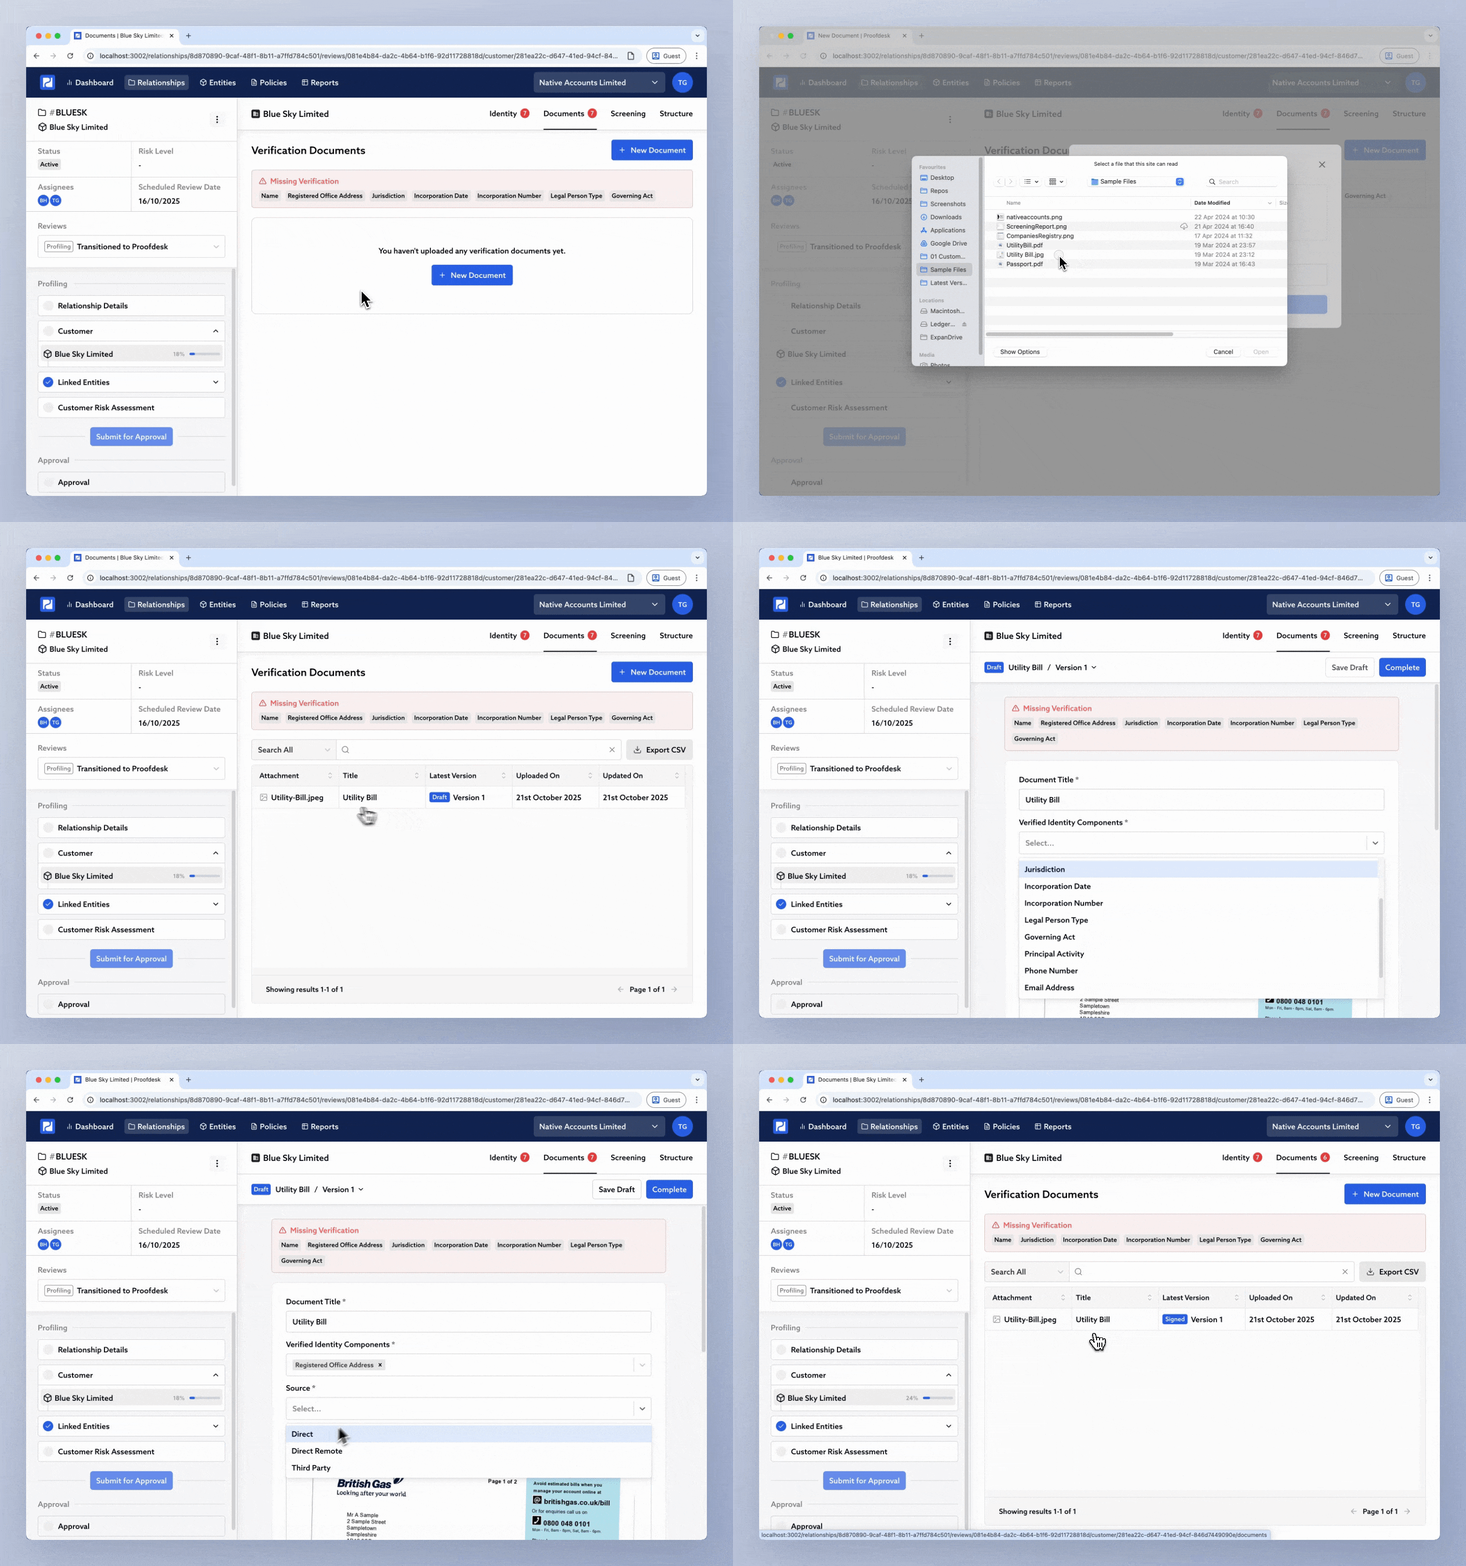
The Documents tab is where you upload verification documents like passports, certificates of incorporation, or proofs of address.
Above the list, you’ll see Missing CDD Verification. These are the required verification documents that haven’t yet been provided, again linked directly to your Identity Policy.
Click + New Document to upload a new file. You can either select a file from your computer or drag one into the window. You’ll be asked to give it a title (for example, Passport) and then click Upload Document. This opens the Document Form, with your file already attached.

In the Document Form, the "Verified Identity Components" field asks which parts of the Identity this document verifies for example: Date of Birth, Residential Address and Nationality. Selecting these tells Proofdesk how the document contributes to your CDD evidence.
Documents can verify multiple identity components. For instance, a passport might satisfy both “Date of Birth” and “Nationality.”
Once you’ve tagged and saved the document, it will appear in the list, and your CDD progress will increase.
The Screening Form
Next, click the Screening tab. This form captures the results of your screening checks.
Your firm’s version may include additional custom fields, but typically you’ll record:
Whether the entity is PEP, and if so, what type
If the entity is sanctioned
Any adverse media that has been discovered
Whether or not the entity is commercially exposed
Proofdesk doesn’t integrate directly with screening providers just yet, so you still conduct the checks in your other tools. This form is about documenting your findings and showing the checks were completed.
Save your progress as you go, and click Complete when done.
The Structure Form
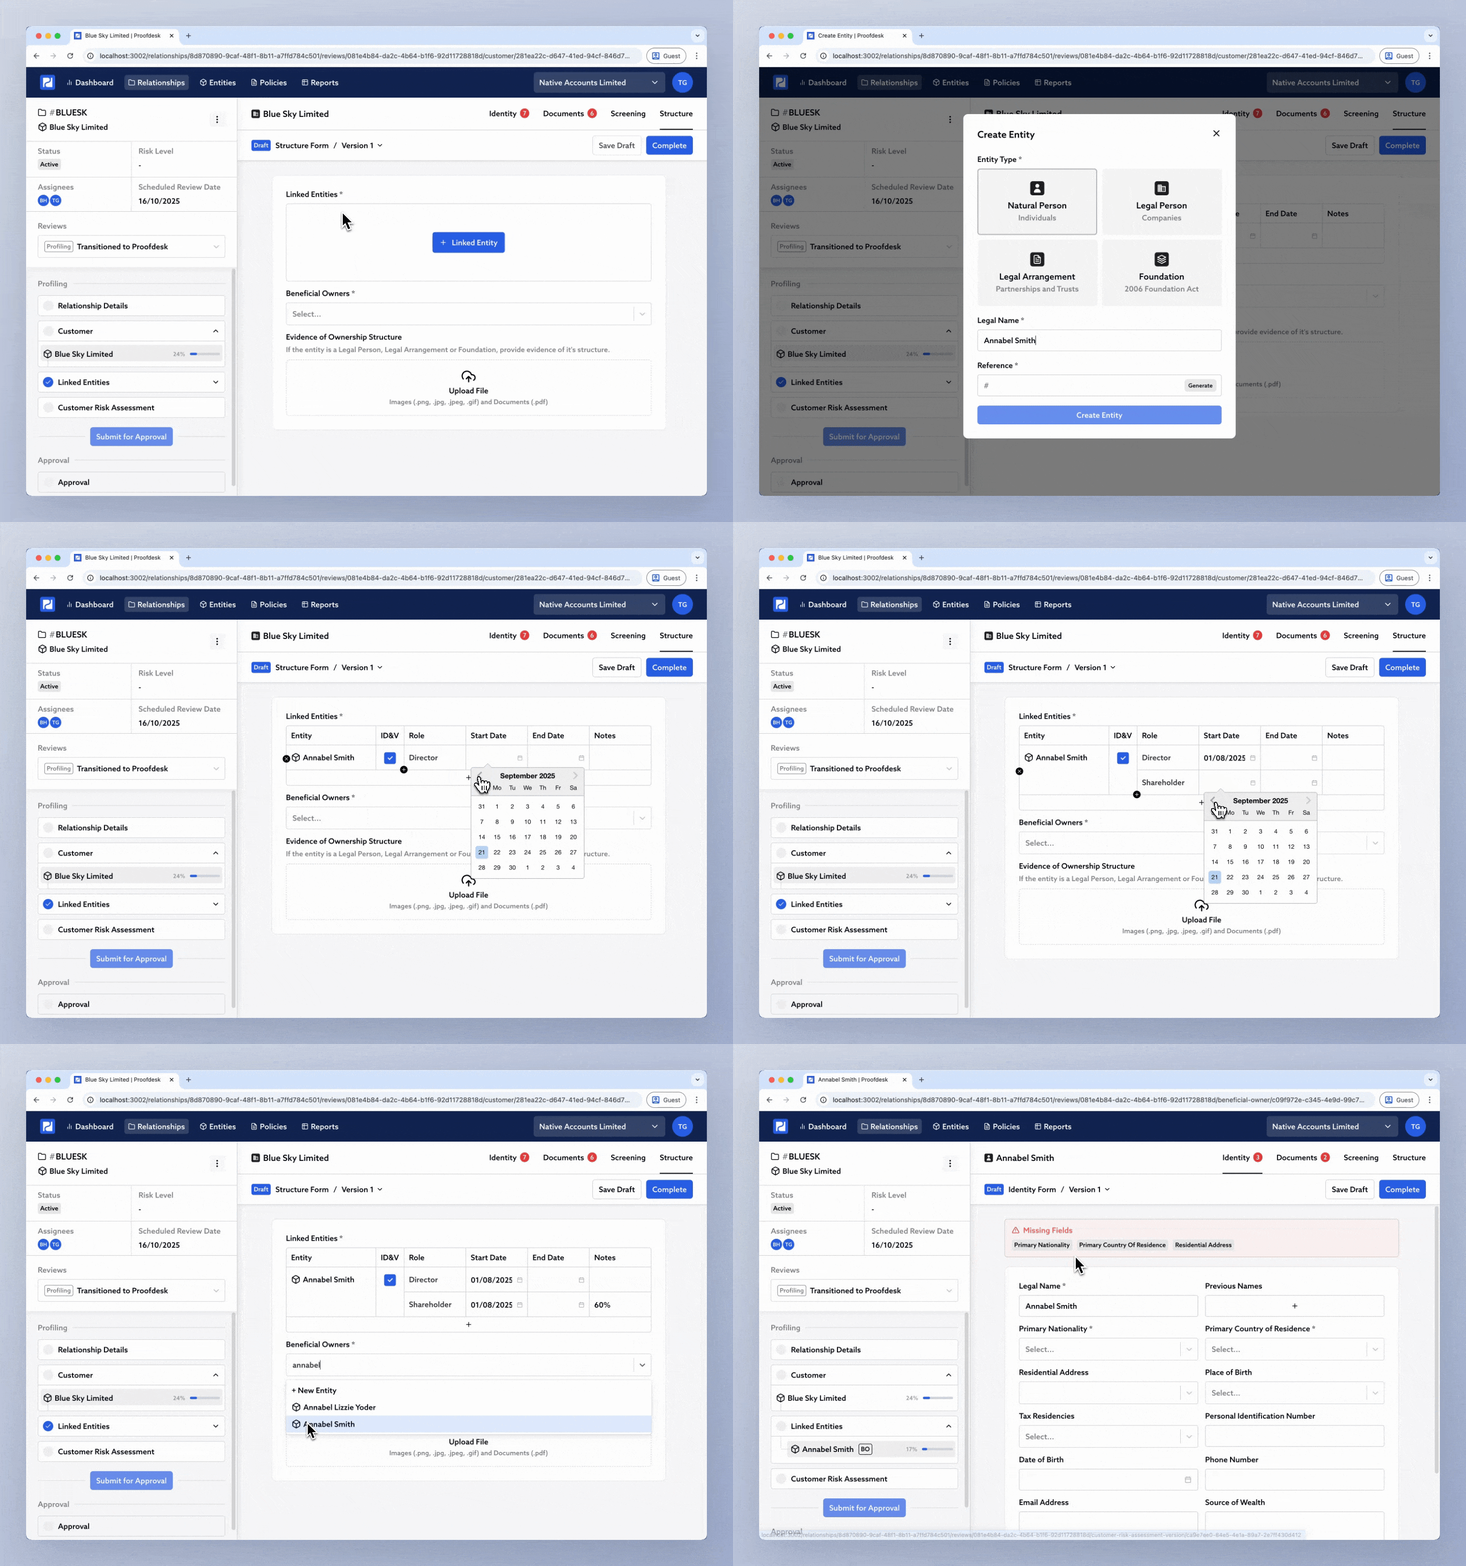
Finally, click the Structure tab. This is where you record how the entity connects to other entities such as directors, shareholders, trustees, beneficiaries, and so on.
At the top, you’ll see a table called Linked Entities. Each row represents a connection between this entity and another one stored in Proofdesk.

When you add a new row, you can:
Select an existing entity, or click + New Entity to create one
Choose the Role like Director, Shareholder, Trustee (Proofdesk automatically tailors the available roles based on the entity type)
Tick or untick ID&V to decide whether to apply your Identity Policy to that connection
Set Start Date and End Date to track when the connection began or ended
Add any Notes, such as ownership percentage or voting rights
If someone holds multiple roles (for example, Director and Shareholder), hover over their row and click the small + under “Role” to add another one with separate start/end dates.
When completing a Structure form, only record the entity’s immediate connections (its direct directors, shareholders, trustees, or beneficiaries). Each of those linked entities will then have their own Structure form where you can record their immediate connections.
Below the table you’ll find the Beneficial Owners field for explicitly identifying who your firm treats as the beneficial owners. Proofdesk doesn’t automatically infer this; it’s always a deliberate decision recorded by your team.
Once complete, click Complete. Entities you’ve added here will appear under Linked Entities in the sidebar, each with their own progress bar showing their CDD status.
As you complete each linked entity’s forms, their progress bars will update just like the customer’s. When all linked entities are marked complete, the Linked Entities section in the Review checklist will show a ✅ tick.